
At some point, every system administrator needs to know what's traveling across his or her network. Whether you're tracking a security problem or simply trying to see if your network is running properly, viewing network packets can be helpful in solving your network problems.
In the case of Ethernet, any system connected to your network can eavesdrop on other systems' conversations. This is known as snooping. If a conversation between two systems consists of a remote login, the password will be visible. All Ethernet controllers read every passing packet to see if the packet is for them. Under normal conditions, the Ethernet controller discards packets without the proper address. However, you can place an Ethernet driver into promiscuous mode, where it interprets each packet received.
Eavesdropping programs take advantage of this promiscuous mode to enable system administrators to read information as it travels across a network. With the release of Solaris 2.x, SunSoft included the snoop utility for system administrators to use to read Ethernet packets. The snoop utility takes advantage of the Ethernet driver's promiscuous mode to perform these tasks.
SunSoft provides snoop to Solaris 2.x administrators to help them debug problems on a network. However, snoop can represent a security risk. Anyone can execute snoop, but read permission is required on the device /dev/le in order to see the output from a snoop session. This makes /dev/le an important device to monitor for possible security problems.
Although anyone can execute snoop, the only user who should utilize it is root. By making sure that the root login is enabled for only the system console, you can maintain security for your system. For more information on how to accomplish this, see the article "Securing Root Access for Your Solaris 2.x System in /etc/default" in the June 1995 issue of Inside Solaris.
Snoop has several features that enable you to filter Ethernet packets for specific information contained within a given packet. Using several command-line variables, you can utilize snoop to view specific portions of Ethernet packets as they pass along your network. Let's take a look at how snoop works and how you can make it work for you.
The snoop utility, found in the /usr/sbin directory, has eighteen variables you can use to view exactly the information you want within a given Ethernet packet. These variables are shown in Table A. When you execute snoop using no variables with the command
# snoop
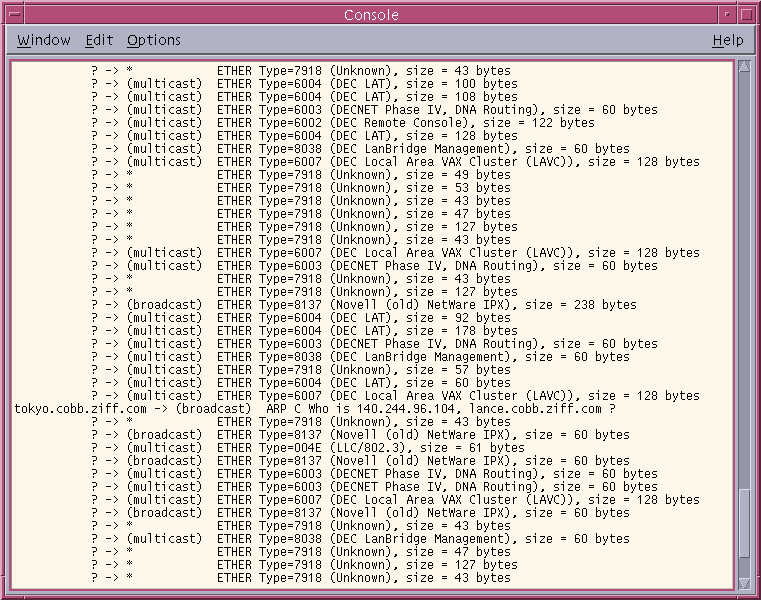
you'll capture all packets as they pass through your Ethernet adapter and display them as they're received, as shown in Figure A.
snoop variables Definition
-a Listens to packets on /dev/audio
-c maxcount Captures the number of packets specified by maxcount and quits
-d device Receives packets from the network using the interface specified by device
-i filename Displays packets previously captured in filename; use i filename after creating a filename with -o
-n filename Uses filename as an IP address-to-name mapping table. Filename must use the same format as the /etc/hosts file
-o filename Saves captured packets to name specified by filename
-p first , last Reads packets captured to a filename, specifying the range of packets displayed with the first and last variables
-s snaplen Truncates each packet captured after the number of bytes specified by snaplen. Useful if only certain packet header information is required
-t (r , a, d) Selects time-stamp presentation for captured packets
r-Time-stamp is relative to the first packet displayed.
a-Time-stamp gives the actual system time for time received.
d-Time-stamp is the interval between packets.
-v Verbose mode prints packet headers in great detail.
-x offset , length Displays the packet data in ASCII and hexadecimal format, with offset and length values specifying the portion of the packet for display
-C Lists the code generated from the filter expression for either the kernel packet filter or snoop's own filter (see expression)
-D Displays the number of packets dropped during capture on the summary line
-N Creates an IP address-to-name file with a capture file
-P Captures packets in non-promiscuous mode; only broadcast, multicast, or properly addressed packets are captured
-S Displays the size of the entire Ethernet frame on the capture summary line
-V Verbose summary mode displays less detail than verbose mode but more than summary mode.
expression Selects packets from the network or capture file from which the expression is true (See the article for details)
Although the information in Figure A might be useful in order to see how much traffic actually occurs on your network, snoop doesn't save the data in any format for future reference. When you use OpenWindows or CDE, your screen buffer allows you to scroll back through the data received. However, once you close the console or terminal window, you lose that information.
Using some of the variables for snoop, you can write the information to a file for later reference offline. For example, if you wanted to save the information displayed in Figure A to a file, you'd execute snoop with the variable
# snoop -o filename
This command lets you capture all received packets to the file you specify. You can then read the file with snoop to see the information that snoop captured.
While the packet capture runs, your window displays a packet count as packets are received. If you want to only view this count without saving the packets to a file, use the filename /dev/null.
In addition to capturing your network Ethernet packets to a file or display, you can also control the amount of information you capture with several variables. The -v option configures snoop to capture in verbose mode. When you read packets from a capture file, use snoop with the -v option to find out the most information about a given packet.
Probably the most common variable you'll utilize with snoop is an expression to filter packets from the network or a data file. You can use an expression such as a host name to capture packets intended only for that host. For example, the command
# snoop widget1
will display packets with the host widget1 as the source or destination of a given packet. In this way, you can look at specific data coming from and going to a given host.
Using multiple expressions, you can also display information between two hosts or machines on your network. The command
# snoop 140.244.96.201 140.244.96.202
will display only packets traveling between the two IP addresses given on the command line. As you can see, the expression filter gives you the ability to specify the data you want to capture or display in order to troubleshoot your network. Table B contains the other valid filter expressions.
Ethernet addresses
Using the format 0:0:0:0:0:0, specify the Ethernet address for the destination or the source of the packet. If the Ethernet address begins with a letter, append a 0 to the address so that snoop won't interpret it as a host name. The address aa:0:5f:66:23:0a would then become 0aa:0:5f:66:23:0a
Broadcast
Captures or displays only broadcast packets
Apple
Captures or displays only Apple Ethertalk packets
ip, arp, rarp
Captures or displays a specific packet type when Ethertype matches the expression
greater/less length
Captures or displays packets greater or less than the length specified in the expression
udp, tcp, icmp
Captures or displays only IP packets with the appropriate type
For more information on all the valid filter expressions you can use with snoop, check your man pages. Now let's use snoop to look at a specific packet.
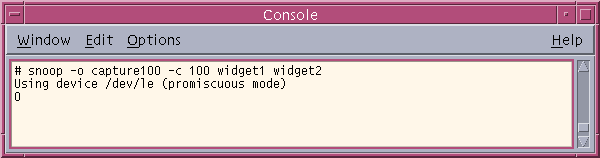
In our example, we'll use the two hosts widget1 and widget2 as the machines we'd like to snoop. First, we'll capture a group of 100 packets to the file capture100, and then we'll examine the file.
To capture packets to the file capture100, we'll use the -o variable. In addition, we'll use the -c 100 variable to capture only 100 packets before stopping the snoop session. The only thing left to add to the command will be the filter expressions for capturing the packets between the two hosts. The command would then look like this:
# snoop -o capture100 -c 100 widget1 widget2
When you execute the command, the counter will begin to count up to the number of packets specified with the -c variable, as shown in Figure B. Once the count reaches the appropriate number, snoop will end. Now that you have your captured packets, you'll want to examine them with snoop.
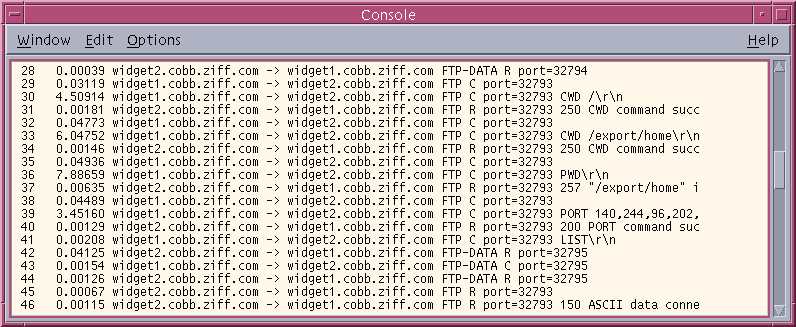
If you want to look at the complete list of the 100 packets you captured to a file in our example, you can use the command
# snoop -i capture100
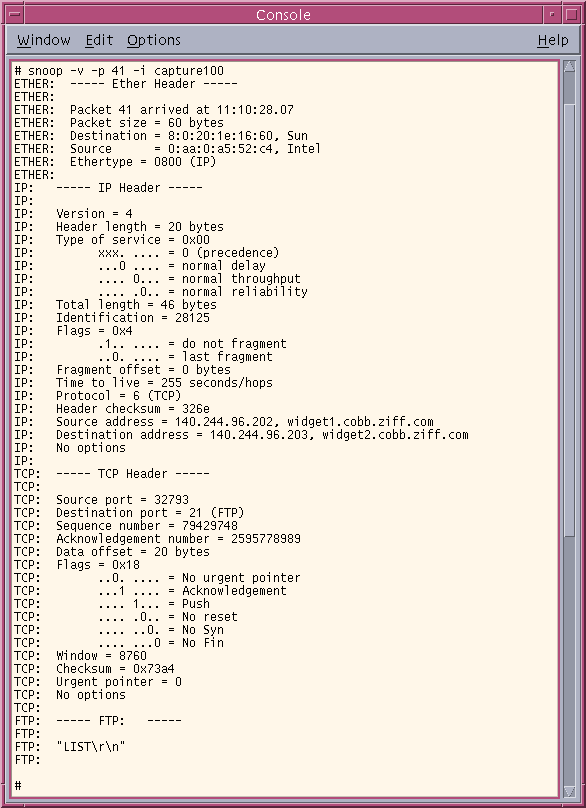
This will produce a list like the one shown in Figure C. To look at a specific packet in verbose mode, select a packet number from the first column of numbers--for example, 41--and use the command
# snoop -v -p 41 -i capture100
to view the packet information, shown in Figure D. From this information, we can see that the packet was involved with an ftp session between the two hosts widget1 and widget2.
Because of the nature of the snoop utility and the way it filters packets as they pass through a given Ethernet adapter, there are a few things you'll want to avoid on a busy network. As a general rule, when using snoop, always capture packets to a file for examination at a later time. Online packet interpretation requires much more of your processing time than reading packets captured to a file does.
One of snoop's side-effects is the generation of extra packets. If you use a naming service such as NIS+ to convert IP addresses to host names, it will create extra packets, thereby increasing the amount of data captured or displayed. This reinforces the idea that when using snoop, you should always capture packets to a file for later viewing. This step will prevent the generation of unnecessary traffic on your network.
When using snoop with the -s snaplen variable, make sure to set large enough values so that you'll capture or display complete header information. For example, NFS packets require at least 120 bytes in the snaplen variable to display complete header records.
Although many system administrators are wary of using snoop to troubleshoot their networks because of a perceived security risk, you can use it to safely debug a network problem. By practicing good security habits on your network, using snoop shouldn't present a risk. In this article, we've discussed using snoop to capture Ethernet packets on your Solaris network for troubleshooting purposes.
[Return to Index for Inside Solaris - November Issue]
Copyright (c) 1995 The Cobb Group, a division of Ziff-Davis Publishing Company. All rights reserved.
Reproduction in whole or in part in any form or medium without express written permission of Ziff-Davis
Publishing Company is prohibited. The Cobb Group and The Cobb Group logo are trademarks of
Ziff-Davis Publishing Company.